Paywall 2.0
Docs › › Paywall 2.0
Last updated: 14 Nov 2018 / 2:09 PM / GMT
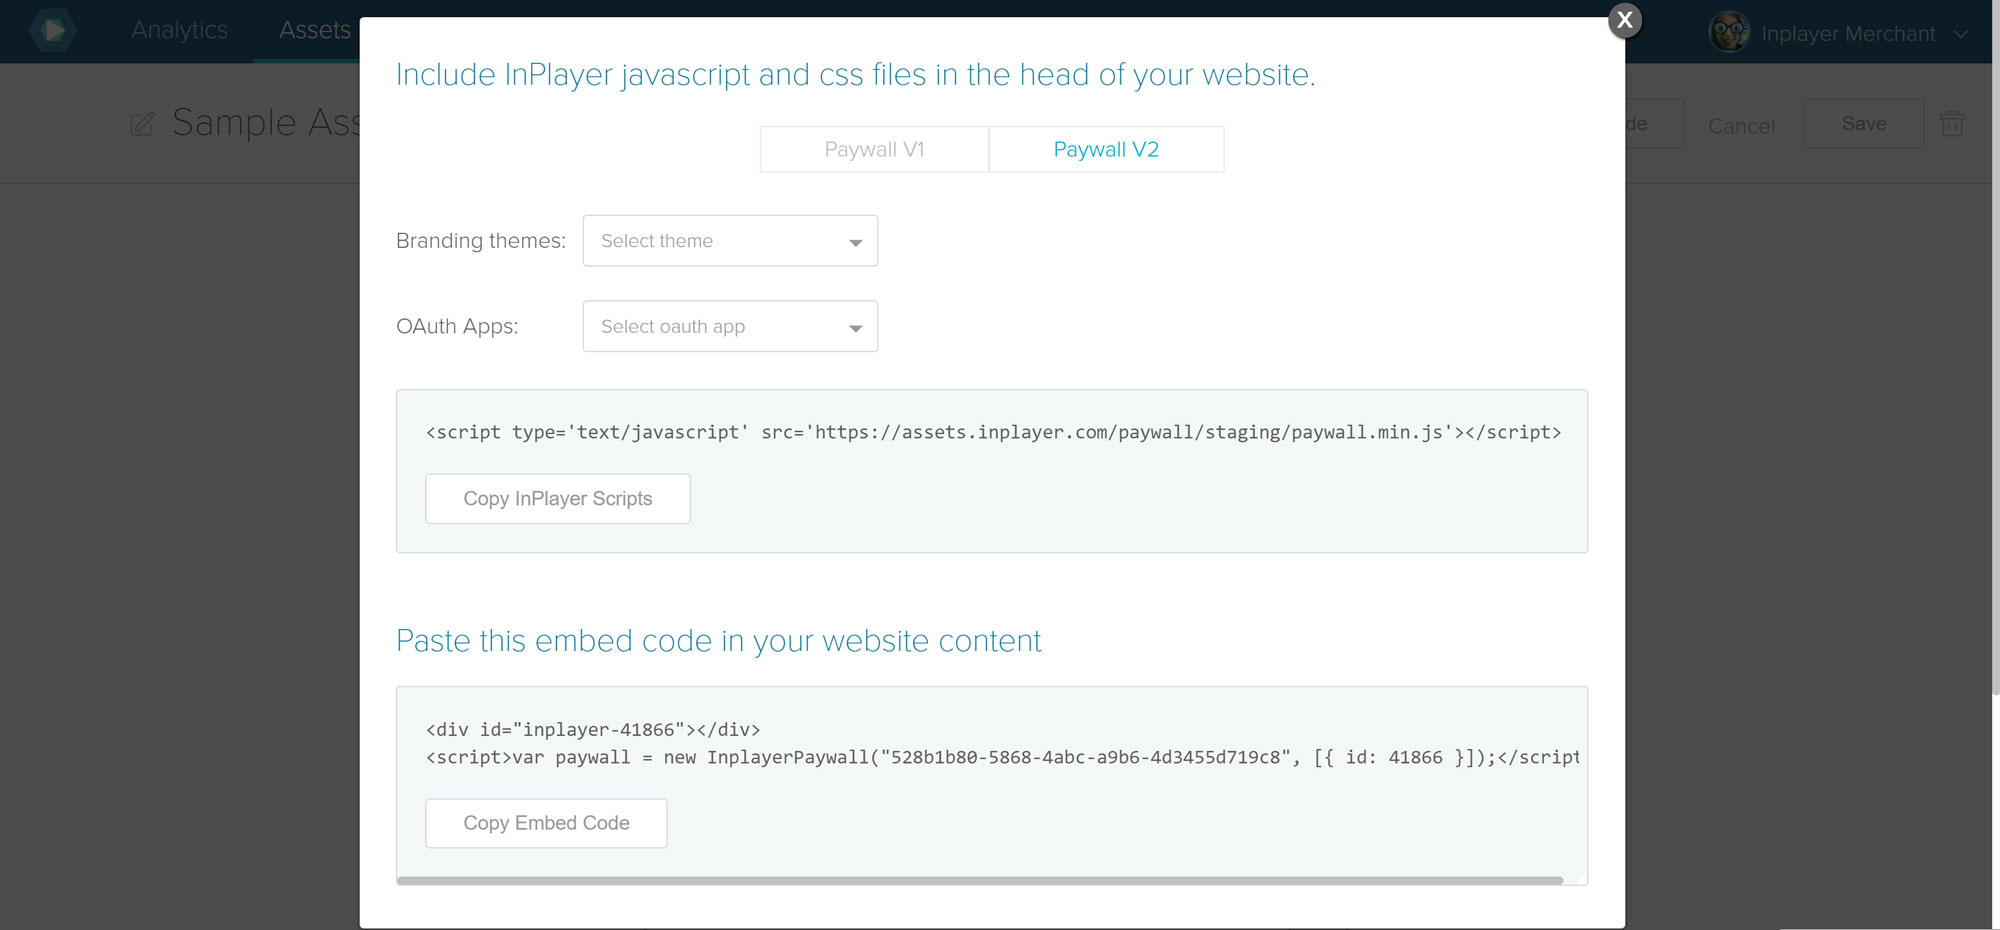
The Paywall 2.0 is the latest content monetization application by InPlayer. It has multiple changes and improvements since the last version. The new embed code can be found at the same place of the first paywall application, in the single asset section. There are two different tabs where the embed code generator can be switched between both Paywall versions.
In addition, here are the paths of both paywall locations, staging and production:
https://assets.inplayer.com/paywall/staging/paywall.min.js
https://assets.inplayer.com/paywall/latest/paywall.min.js
The Paywall 2.0 embed code is sightly different from the previous one. The first part of the embed code now is only one minified JS file, since the CSS is added inside:
<script type='text/javascript' src='https://assets.inplayer.com/paywall/staging/paywall.min.js'></script>
The second part of the embed code, the asset embed, has the following format:
<div id="inplayer-ASSET_ID"></div>
<script type="text/javascript">
var paywall = new InplayerPaywall(MERCHANT_UUID, [{ id: ASSET_ID}]);
</script>
In case the asset is of OVP asset type, the embed code can be constructed given the original VIDEO ID from the external OVP source. The format for external asset ID embed is the following:
<div id="inplayer-OVP_VIDEO_ID"></div>
<script type="text/javascript">
var paywall = new InplayerPaywall(MERCHANT_UUID,
     [
      {
         external: {
            type: 'OVP_NAME',
            id: OVP_VIDEO_ID,
         },
      },
     ]
)
</script>
The Paywall 2.0 support multiple assets embed code. In case multiple assets are needed, they just need to be included in the JavaScript code as an array. The position of the html elements where the assets will be rendered is not important. In addition there is full html example of multiple assets embed code in action.
<script type='text/javascript' src='https://assets.inplayer.com/paywall/staging/paywall.min.js'></script>

<div id="inplayer-ASSET_1_ID"></div>
<div id="inplayer-ASSET_2_ID"></div>
<div id="inplayer-ASSET_3_ID"></div>

<script type="text/javascript">
var paywall = new InplayerPaywall(MERCHANT_UUID, [{id: ASSET_1_ID}, {id: ASSET_2_ID}, {id: ASSET_3_ID}]);
</script>
The additional options in the embed code can be set up for two different cases. Asset options, which can be set up per asset, and global paywall options, which affect all assets. The asset embed code options should be passed in addition to the asset id:
<div id="inplayer-ASSET_ID"></div>
<script type="text/javascript">
var paywall = new InplayerPaywall(MERCHANT_UUID,
     [
      {
        id: ASSET_ID,
        //per asset options object
        options: {
            noPreview: true,
            brandingId: "111222",
            noInject: true
        }
      }
     ]
)
</script>
If the options are used as in the example from above, they will affect only the asset. In case there are multiple assets and global paywall options are needed for every asset in the embed code, the options should be passed outside of the assets list in the following way:
<div id="inplayer-ASSET_ID"></div>
<script type="text/javascript">
var paywall = new InplayerPaywall(MERCHANT_UUID,
     [
      {
         id: ASSET_ID
      },
     ],
     //global options object
     {
       language: 'EN',
       hideUserMenu: true,
       hideLogo: true,
       hideProtectedBy: true
     }
)
</script>
Here is a list of all Paywall options, per asset and global ones:
| Option | Description | Format | Type |
|---|---|---|---|
| accessFeeId | Pre-selects price of a specific access fee. Price option screen will be skipped | Number | asset option |
| noInject | If true, skips the premium content injection after successful payment | Boolean, true or false | asset option |
| noPreview | If true, the asset preview will not be rendered. Used for custom preview | Boolean, true or false | asset option |
| brandingId | Sets a specific branding theme for the asset (has highest priority) | Number | asset option |
| language | Default language | Language code | global option |
| hideUserMenu | Hides the default menu of logged account | Boolean, true or false | global option |
| hideLogo | Hides the Paywall logo | Boolean, true or false | global option |
| footerLinks | Inserts external links in the Paywall footer | Json, ex. { text: “Google”, url: “https://www.google.com/” } | global option |
| hideFooterLinks | Hides the Footer links | Boolean, true or false | global option |
| hideProtectedBy | Hides the protected by logo | Boolean, true or false | global option |
| oauthAppKey | Sets the OAuth application to be used for authentication | String | global option |
| brandingId | Sets global branding theme for all assets on a page | Number | global option |
In the InPlayer platform each asset type has its own content format implementation. In most of the cases where the asset is of OVP type(online video provider hosted videos) the Paywall will create a video player after an account with premium access ask for the content.
Each OVP has its own player implementation. The InPlayer paywall will render the default players with standard player parameters. However, if in some cases it is needed to change the player or to change some player parameter, it is possible to pass custom player scripts and custom player parameters through the InPlayer embed code. With the following example code it is shown how player scripts or parameters can be altered:
<div id="inplayer-ASSET_ID" class="inplayer-paywall"></div>
<script>
var paywall = new InplayerPaywall(MERCHANT_UUID, [{ id: ASSET_ID, options: {
    playerScripts: [
        {
            src: 'http://player.ooyala.com/static/v4/stable/latest/core.min.js',
            id: 'ooyala-core',
            type: 'script',
            async: false,
        },
        {
            src: 'http://player.ooyala.com/static/v4/stable/latest/video-plugin/main_html5.min.js',
            id: 'ooyala-main',
            type: 'script',
            async: false,
        },
        {
            src: 'http://player.ooyala.com/static/v4/stable/latest/skin-plugin/html5-skin.min.js',
            id: 'ooyala-skin',
            type: 'script',
            async: false,
        },
        {
            href: 'http://player.ooyala.com/static/v4/stable/latest/skin-plugin/html5-skin.min.css',
            id: 'ooyala-css',
            type: 'stylesheet',
        },
    ],
    playerParams: {
        width: '800px',
        height: '300px' ,
        autoplay: true
    }
}}]);
</script>
In the example code from above its shown how new OOYALA player scripts are passed along with additional params that will affect and possibly overwrite the video player details. The same format should be used for all OVPs, with their own corresponding scripts.
The paywall instance has methods that can be used for accomplishing different functionalities. This adds to the flexibility of the application in covering various use-cases in addition to what can be accomplished via the embed code.
Below is a description of all paywall methods:
Set Language Method
This method sets the language of the paywall interface. We have noticed it to be especially useful when there is a multilingual page for combining the language picker on the page to change the language of the paywall as well. In that way, the experience is much smoother for the end user.
For instance, to set the paywall language to Danish, the following implementation is needed:
<script>
    paywall.setLanguage('dk');
</script>
It is important to note that the language specified as method argument should be the short 2 letter code for the language.
Show Paywall Method
The showPaywall method is a multi functional method that provides option to invoke the paywall application for different use-cases via a custom HTML element on the page. This method has the following structure (with all argument option included):
<script>
    paywall.showPaywall({
      asset: {
        assetId: 42564,
        preselectedFeeId: 4508
      },
      registerFirst: true
    });
</script>
More specifically:
-
assetId – is part of the asset object in the method argument and represents id of a specific InPlayer asset. When attached to an HTML element click event, the method will open the paywall modal. If the user is not authenticated the login screen will be shown. After successful authentication, the price option screen where all prices added to the asset will be shown, allowing the end user to select one and proceed with the payment flow.
Usage example:
<script> paywall.showPaywall({asset: { assetId: 42564 }}); </script> -
preselectedFeeId – is part of the asset object in the method argument and represents id of a specific price added to an InPlayer asset. It is always used together with the asset id where the price is added. When attached to an HTML element click event, the method will open the paywall modal. If the user is not authenticated the login screen will be shown. After successful authentication, the end user will be sent directly to the payment screen where the specified price will be set for purchase.
Usage example:
<script> paywall.showPaywall({ asset: { assetId: 42564, preselectedFeeId: 4508 } }); </script> -
registerFirst – boolean parameter (true/false) that specifies whether the register or login screen of the paywall should be shown by default when the modal is open.
Usage example:
<script>
    paywall.showPaywall({ registerFirst: true });
</script>
The object argument for the showPaywall method is optional. This means that the method can be invoked with no arguments. With that way of usage, if the user is not authenticated, the login screen will be shown, and after successful authentication the modal will be closed. Upon subsequent invoking of the method, with the user being logged in, the account screen will be shown.
Usage example:
<script>
    paywall.showPaywall();
</script>
Is Authenticated Method
The isAuthenticated method is a boolean method that tells whether there is an end user authenticated on the page.
Usage example:
<script>
    paywall.isAuthenticated();
</script>
The InPlayer Paywall supports standalone functionalities for several purposes: login/logout button functionality as well as accessing the my account section of the paywall application.
Although you may use the paywall JavaScipt methods to invoke some functionality or certain paywall screens, there is an implementation with adding HTML classes to elements on the page. Here is the list of HTML classes that can be used to create each standalone functionality.
| HTML class | Description |
|---|---|
| inplayer-paywall-login | Invokes the login screen of the paywall |
| inplayer-paywall-logout | Invokes the logout action |
| inplayer-paywall-account | Invokes the my account screen of the logged in user |
The advantage of using these classes is that they come with built in logic for displaying and hiding the elements depending on whether the user is authenticated or not. For example, the HTML element with the inplayer-paywall-logout class, will be shown only when the user is authenticated.
Each asset in the InPlayer platform has its own preview template with call-to-action button that is rendered after serving an asset embed code on a web page. Those preview templates can be edited and tweaked in the dashboard, but in some cases the given flexibility doesn’t solve whats needed. Therefore the paywall supports a functionality for creating fully custom HTML preview for each embedded asset, and a way to add call-to-action button that will trigger the paywall experience.
First a standard embed code is needed with noPreview option added:
<div id="inplayer-ASSET_ID"></div>
<script type="text/javascript">
var paywall = new InplayerPaywall(MERCHANT_UUID,
     [
      {
        id: ASSET_ID,
        options: {
            noPreview: true
        }
      }
     ]
)
</script>
The embed code from above will create a Paywall object but there will be no preview template, there will be nothing on the screen. Next step is to add your own custom preview HTML code with call-to-action button inside of the DIV element of your asset. The reason why the preview code needs to be inside the asset DIV container is because the paywall will swap that content with the real asset after purchase.
<div id="inplayer-ASSET_ID">
// Create your HTML custom preview here
<button id="my-paywall-button">purchase</button>
</div>
<script type="text/javascript">
var paywall = new InplayerPaywall(MERCHANT_UUID,
     [
      {
        id: ASSET_ID,
        options: {
            noPreview: true
        }
      }
     ]
)
</script>
Now we have a custom preview and a custom call-to-action button that should invoke the paywall screen. To make the button functional, we need the following code:
document.getElementById('my-paywall-button').addEventListener("click", () => {
   paywall.showPaywall(
    {asset: { assetId: 42564 }}
   )
});
The showPaywall method is linked to the button. It will trigger the paywall functionality. Thats the final step for functional custom preview template.
There is a usual need of content owners to be able to trigger the paywall for only specific price point of certain asset on some action button. In case there is a need to present two different pricing options on two different HTML blocks and buttons for the same asset(for example when its needed to clearly show different options of Subscription vs PPV with custom details, and which features the viewers will get after purchasing each price option), here is the way to do it:
We will take a scenario with one asset, that inherit two different prices for a package. The idea is to create custom descriptions for both prices and different buttons that will lead to only specific price.
The first step would be adding embed code that will create the Paywall object for the asset.
<div id="inplayer-ASSET_ID"></div>
<script type="text/javascript">
var paywall = new InplayerPaywall(MERCHANT_UUID,
     [
      {
        id: ASSET_ID,
        options: {
            noPreview: true,
            noInject: true
        }
      }
     ]
)
</script>
As you can notice it is a standard asset embed code with two additional parameters: noInject and noPreview. The noInject parameter will stop the paywall from injecting a video after a successful purchase. Since the point is to create custom pricing options screen the content injection is not needed. The second parameter noPreview will remove the standard preview template for the asset allowing custom preview for each price.
Now after the Paywall object is created we may use additional methods to invoke functionalities. The next thing that needs to be done is the custom HTML blocks that will describe both pricing options and call-to-action buttons for each of them.
Add the custom HTML code for the first price:
// First price description HTML code
<button id="first-price-button">purchase</button>
Now add the paywall trigger functionality to the button for the corresponding price:
document.getElementById('first-price-button').addEventListener("click", () => {
   paywall.showPaywall(
    {asset: { assetId: 42564, preselectedFeeId: 4508 }}
   )
});
With this code the method showPaywall functionality is connected to your action button for one price. It will invoke the paywall flow but with pre-selected price as the preselectedFeeId parameter. The pricing screen will be skipped since there is a specific price option selected already on that action. Because there is noInject option in the code where the Paywall object is created, after a successful purchase the paywall modal will be closed.
For the second price, the same showPaywall function needs to be added to the second button, but with different preselectedFeeId parameter that identifies the other price option.